MQTT-Node-RED控制二軸云台-ESP32
MQTT-Node-RED控制二軸云台-ESP32
伺服馬達對於微控板玩家一定是再熟悉不過,也是入門必學的元件之一,只是特別要注意如果要控制2個以上的伺服馬達,一定要使用外接電源或者PCA9685。
伺服馬達有很多款,小型常用的就屬SG-90,它是塑膠齒輪,還有一種是金屬齒輪
SG-90規格

- 工作電壓:4.8V.
- 轉矩:1.8kg-cm
- 運轉速度:0.1秒∕ 60度
- 轉動角度:最大90°
- 脈衝寬度範圍:500~2400µs.
MG90S規格

- 金屬銅齒、空心杯電機、雙滾珠軸承
- 產品型號:MG90s.
- 扭力:2.0kg(4.8v)
- 運轉速度:0.11s(4.8v)
- 轉動角度:最大90°/180°
- 舵機類型:數字舵機
- 此次實驗以MG-90為主
- 要控制伺服馬達有兩種方式,一種是利用PWM,另一種是使用現有的庫包來控制,本次實驗以庫包為主
首先安裝
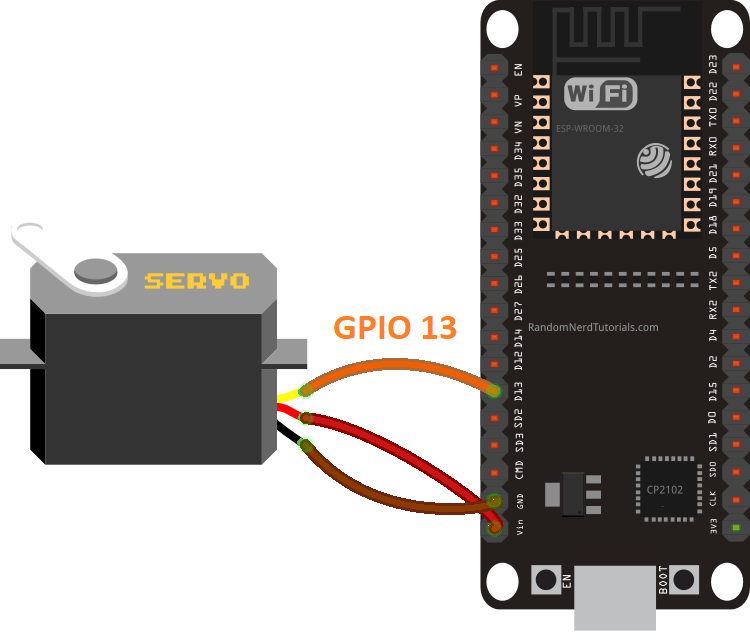
接線方式
- GND -> ESP32 GND pin;
- Power -> ESP32 VIN pin;
- Signal -> GPIO 13 (or any PWM pin).
進行實驗
- #include <ESP32Servo.h>Servo myservo;int pos = 20;const int pin = 12;void setup(){Serial.begin(115200);myservo.attach(pin, 500, 2400);}void loop(){for (pos=20; pos<=160; pos+=3){myservo.write(pos);delay(100);}for (pos=160; pos>=20; pos-=3){myservo.write(pos);delay(100);}}
先備妥樹莓派上所須的軟硬體
- 安裝Mosquitto broker(如果沒玩過樹莓派,請連結這裡安裝樹莓派系統和如
- 何使用SSH和VNC鏡像)
- 安裝 Node-RED installed 和 Node-RED Dashboard在樹莓派上。
- 備註:安裝Node-RED時若出現錯誤訊息改用下面所附下載 bash <(curl -sL https://raw.githubusercontent.com/node-red/linux-installers/master/deb/update-nodejs-and-nodered)
布署Node-RED


程式碼
#include <ESP32Servo.h>
#include <WiFi.h>
#include <PubSubClient.h>
//伺服馬達初始化
Servo myservoPan, myservoTilt;
const int pan = 12;
const int tilt = 13;
const char *ssid = "---";
const char *password = "----";
const char *mqttServer = "192.168.--.--";
//wifi客戶端及MQTT客戶端代數
WiFiClient espClient;
PubSubClient client(espClient);
//wifi連線
void wifiConn(){
WiFi.begin(ssid, password);
while (WiFi.status() != WL_CONNECTED){
Serial.print(".");
delay(500);
}
Serial.println("Connected successful!");
// Serial.print("IP: ");
// Serial.println(WiFi.localIP());
}
void callBack(char *topic, byte *message, unsigned int length){
//列出mqtt接收到的主題和字元
String msgPan, msgTilt;
Serial.print("topic: ");
Serial.println(topic);
Serial.print("message: ");
for (int i = 0; i < length; i++){
Serial.print(char(message[i]));
msgPan += char(message[i]);
msgTilt += char(message[i]);
}
Serial.println();
//接收到的字元如果符合就執行相應的動作
if (String(topic) == "esp32/servoPan"){
myservoPan.write(msgPan.toInt());
delay(100);
}else if (String(topic) == "esp32/servoTilt"){
myservoTilt.write(msgTilt.toInt());
delay(100);
}
}
//萬一連不上mqtt就重新連線
void reconnMqtt(){
while (! client.connected()){
Serial.println("嚐試連線MQTT...");
if (client.connect("esp32Client")){
Serial.print("已連線");
client.subscribe("esp32/servoPan");
client.subscribe("esp32/servoTilt");
}else {
Serial.print("無法連線的原因是: ");
Serial.print(client.state());
delay(2000);
}
}
}
void setup(){
Serial.begin(115200);
//伺服馬達腳位和範圍
myservoPan.attach(pan, 500, 2400);
myservoTilt.attach(tilt, 500, 2400);
wifiConn();
//mqtt初始化
client.setServer(mqttServer, 1883);
//監聽訂閱傳來的訊息
client.setCallback(callBack);
}
void loop(){
if (! client.connected()){
reconnMqtt();
}
client.loop();
}


留言
張貼留言